Introduction
When working with Smalltalk, you sometimes wish to access functionality that exists only in a specific library or technology that you cannot or simply don't want to reinvent. When you are in this scenario, two options come to mind:
- FFI, or Foreign Function Interface, which is a mechanism to enable a program written in one programming language to interact with code written in another programming language. Essentially, a "bridge" that allows them to communicate and exchange information with each other.
- Somehow make the Smalltalk Virtual Machine to have more primitives that extend its default functionality to produce this communication back and forth, from the Smalltalk code and these other libraries.
In developing terms, FFI is usually the fastest way to achieve this and, for Pharo, is extensibly covered in Unified FFI - Calling Foreign Functions from Pharo by Guillermo Polito, Stéphane Ducasse, Pablo Tesone and Ted Brunzie.
In this article, we'll delve into the less-traveled road of extending the Pharo Virtual Machine with an external plugin by creating a HelloWorldPlugin. With this, I want to provide some clarity that could demystify the process of making extensions in this way by understanding the steps currently needed to achieve this in Pharo 9, as per February 2023.
Motivation
The primary motivation behind extending the Pharo Virtual Machine with a plugin is often performance, but in some cases, it can also simplify the process of accessing specific functionality. For instance, if you have a favorite library that can only be used by Python or Lua, as a Smalltalker, you may be forced to create a bridge to these technologies, adding additional setup instructions and increasing the complexity of your application's technology stack. With the use of plugins, however, you can extend Smalltalk and keep the complexity of your tech stack to a minimum. After all, Smalltalk when used keeping an elegant software design, can be considered a tool for dominating complexity.
Back to performance, you will easily find cases where the FFI marshaling back and forth process might be considered too costly, and your Smalltalk application would find a more desirable alternative in getting dedicated primitives from a plugin to use the targeted functionality. You may be using plugins like FilePlugin, FloatArrayPlugin, SocketPlugin, and UnixOSProcessPlugin without even realizing it and, as you can imagine, they are all performance critical.
Let's work on your new HelloWorldPlugin now. Here is the outline of the development cycle for it:
┌───────────┐
│MyPlugins/ │
└──┬┬───────┘               Plugin image
   ││  ┌──────────────────┐       │
   └┼─▶│HelloWorldPlugin/ │◀──────┘
    │  └──────────────────┘
    │  ┌──────────┐
    └─▶│pharo-vm/ │◀──────────────┐
       └──────────┘               │
                       Code to produce builds
Setup procedure
You'll need to do this once:
- A directory where you'll use a Pharo image for coding your plugin. Let's refer to this as "the plugin image".
- A directory with a clone of the pharo-vm project
- In the plugin image, you'll install
BaselineOfVMMakerwhich has all the infrastructure needed to produce the sources that you will later compile in a build process. - In the plugin image, you'll checkout the
Pharo9branch from origin for compatibility with this guide.
Development procedure
You'll iterate this part producing builds of your plugin until you get to the final version:
- In the plugin image, you'll locally create a new branch using that
Pharo9branch. That is your plugin development starting point. For this exercise we'll create a this branch naming itHelloWorldPlugin. - In the plugin image, you'll add the code of the
HelloWorldPluginclass and its methods. - In the plugin image, you'll update (needed only once) which the external plugins are going to get generated adding
HelloWorldPluginto the list and you'll commit that. Note: you will only pick to commit that change and not any other automated change that Iceberg might detect.
Building procedure
- From the
MyPlugindirectory, you'll run thecmakecommand to configure the environment for compilation. - From the
MyPlugin/builddirectory, you'll run themakecommand to compile and produce the build. - From the
MyPlugin/pharo-vmdirectory, you'll editplugins.cmaketo make it include in the build the generated sources ofHelloWorldPlugin. - From the
MyPlugindirectory, you'll run thecmakecommand again to configure everything including the generated code of your plugin. - From the
MyPlugindirectory, you'll run themakecommand to compile producing the binaries.
Note: If you don't follow the sequence of the development cycle, you'll notice that cmake can easily run into problems by not finding the sources of HelloWorldPlugin automatically generated in build/generated/64/plugins/src/HelloWorldPlugin. The first round of cmake and make (steps 8 and 9) are not actually to produce the binaries you'll want, but only to have make producing the generated sources that you'll use after plugins.cmake gets edited to include your plugin and then built with step's 5 make.
Setup
Go to your favorite folder for your code and prepare a directory to work with this, here I'll call it MyPlugins:
$ cd ~/yourFavoriteCodeDirForThis
$ mkdir MyPlugins
$ cd MyPlugins
Clone the Pharo code for building Pharo VMs:
$ git clone [email protected]:pharo-project/pharo-vm.gitCreate the HelloWorldPlugin directory to have the image to produce the new code, so go ahead ad grab a fresh pharo 9 and start it:
$ mkdir HelloWorldPlugin$ pwd
...blah/MyPlugins/HelloWorldPlugin
$  curl get.pharo.org/64/90 | bash
$  curl get.pharo.org/64/vm90 | bash
$ ./pharo
Off-topic, if you are like me, the first thing to do on fresh Pharo images is to tune the visuals by loading in a Playground:
Metacello new
    baseline: 'PharoDawnTheme';
    repository: 'github://sebastianconcept/PharoDawnTheme';
    load.
Now, from this plugin image, add the repository from the cloned pharo-vm project using Iceberg and checkout the Pharo9 branch:
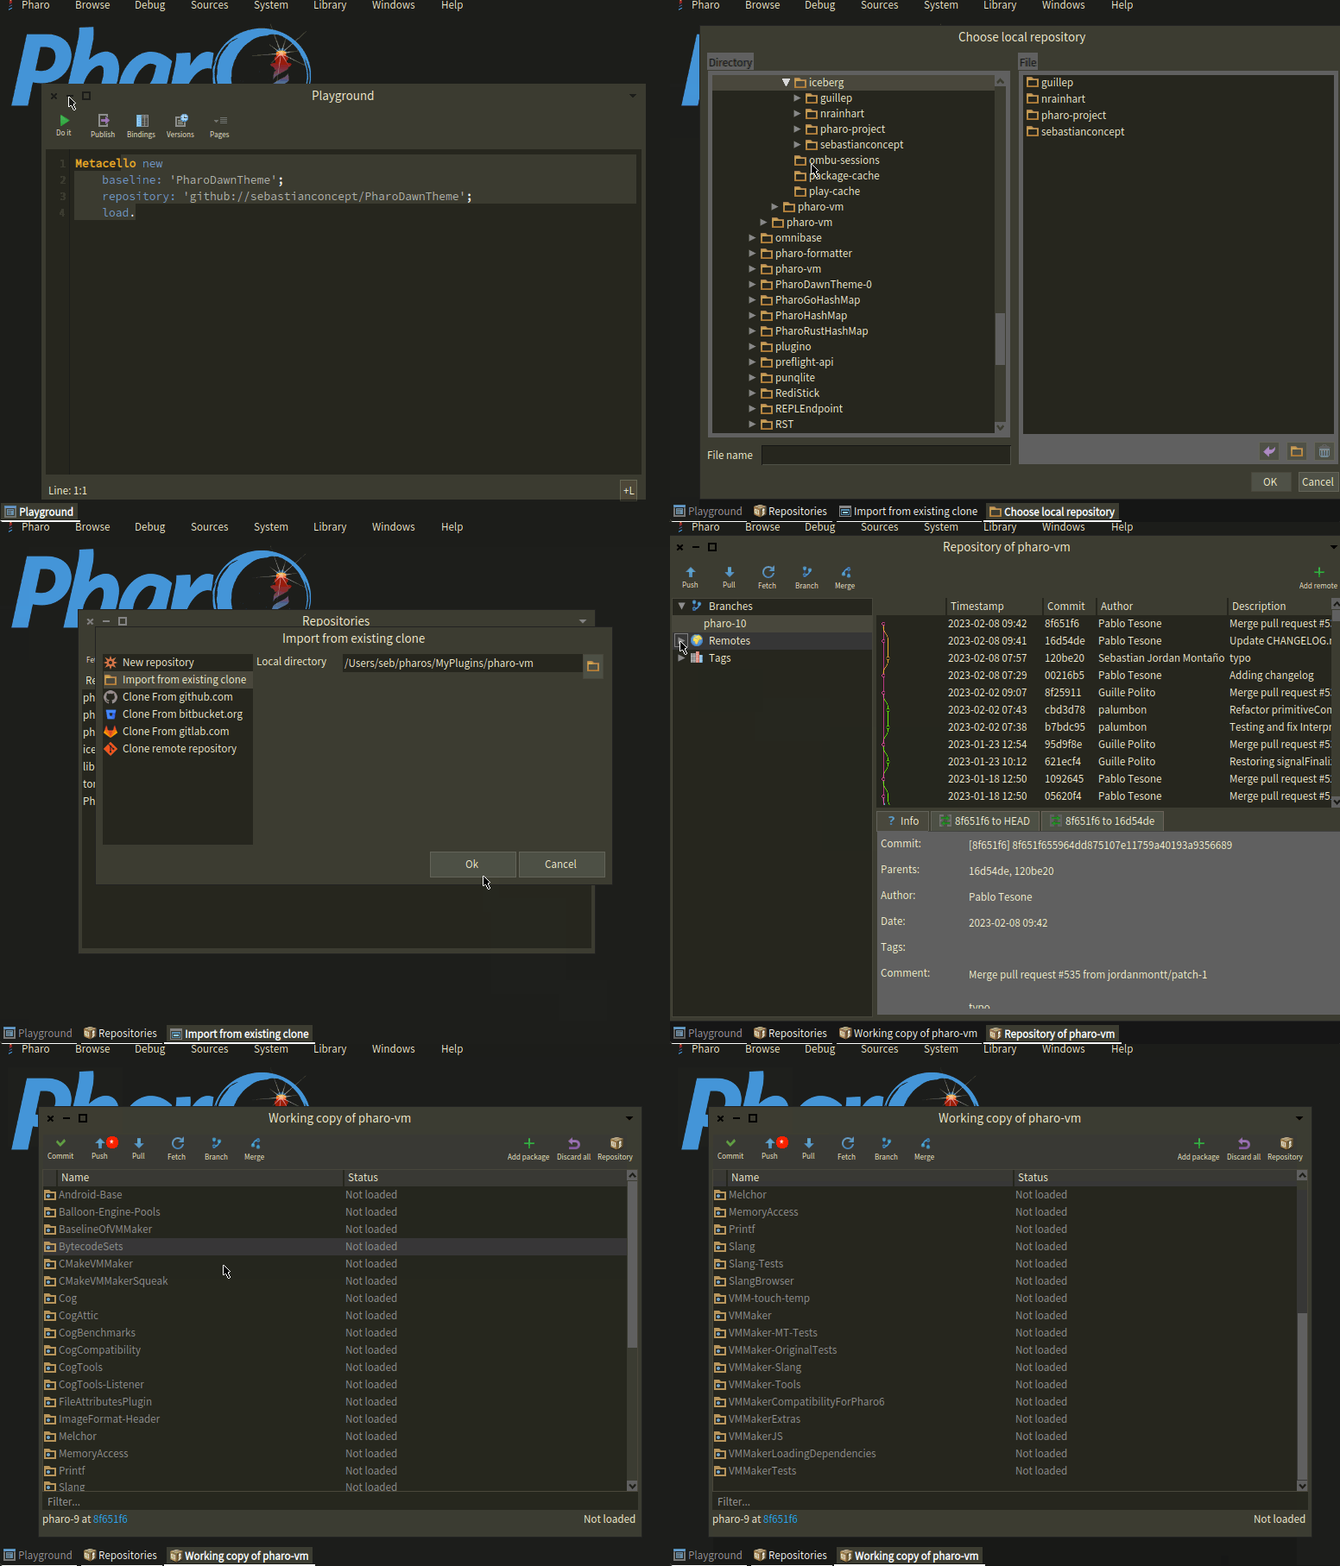
Now, load BaselineOfVMMaker:
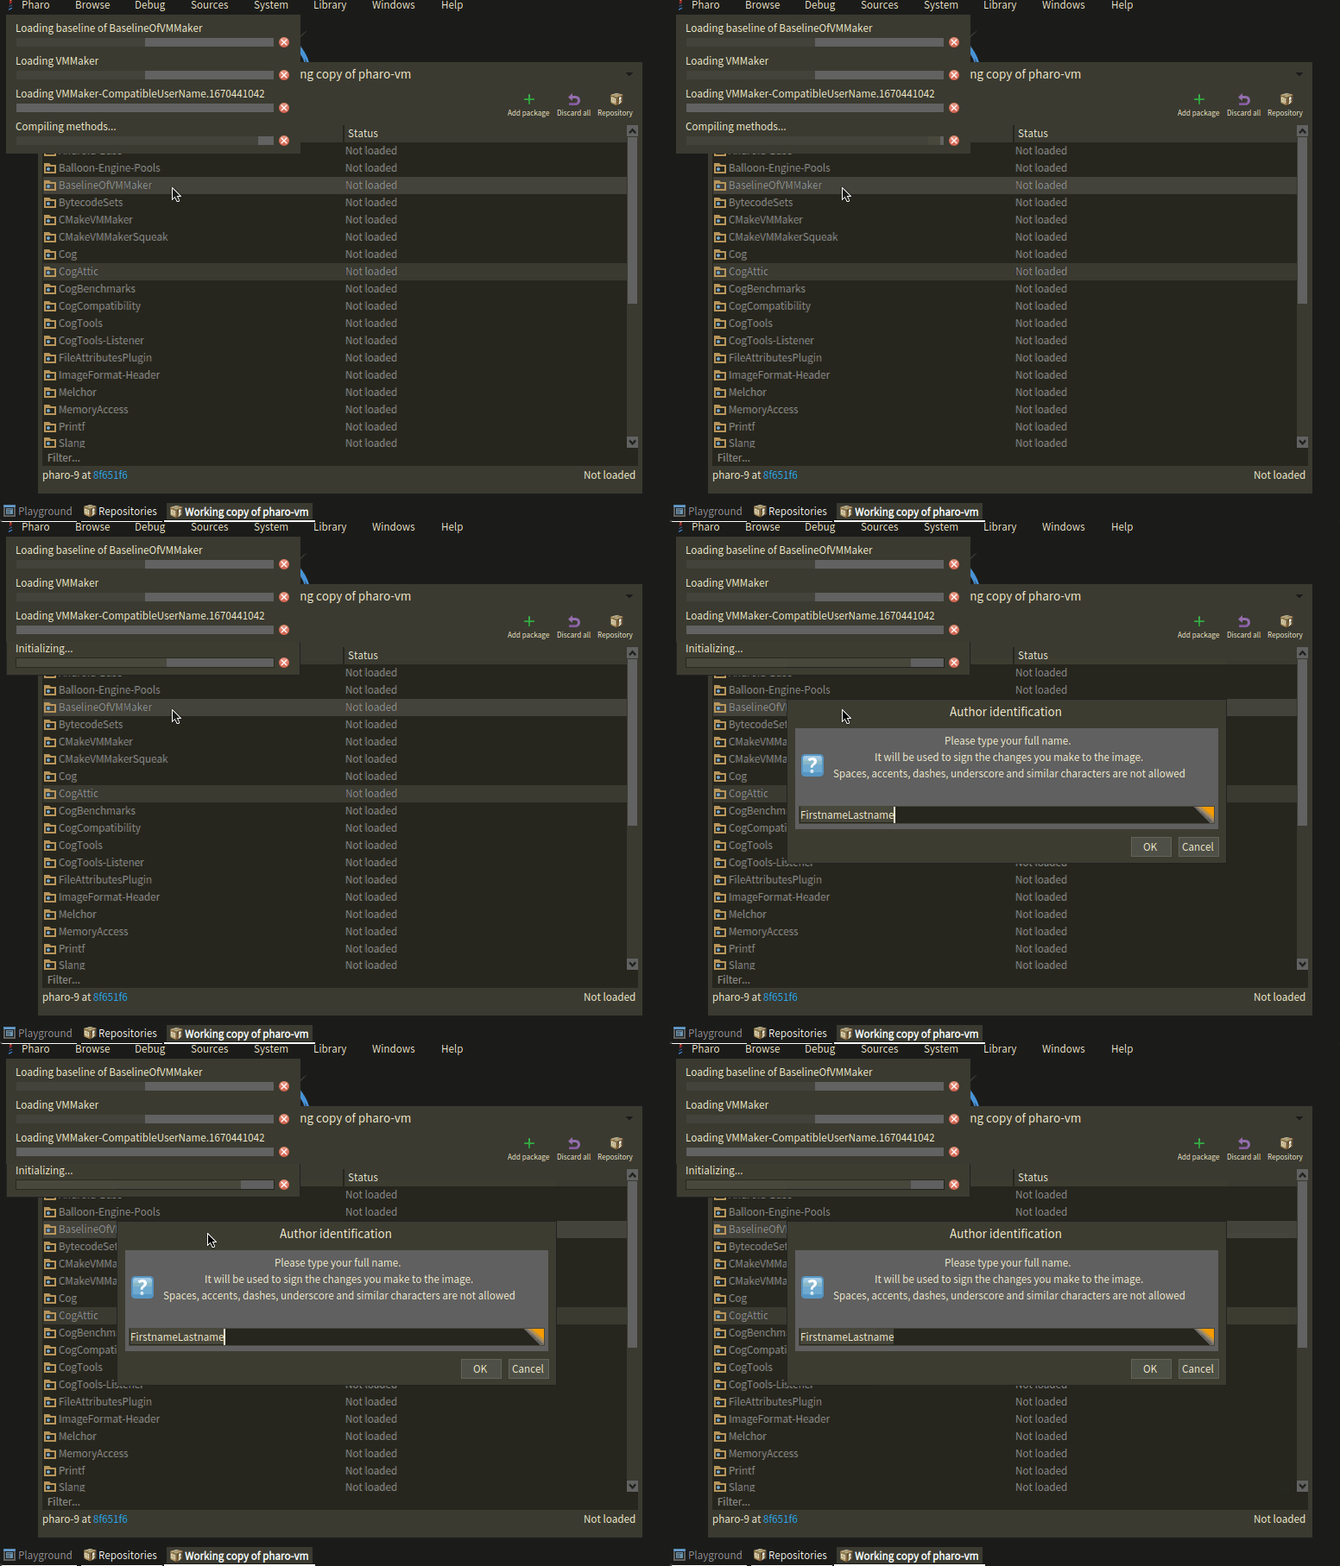
Next, from the Pharo9 branch, create the new HelloWorldPlugin branch:
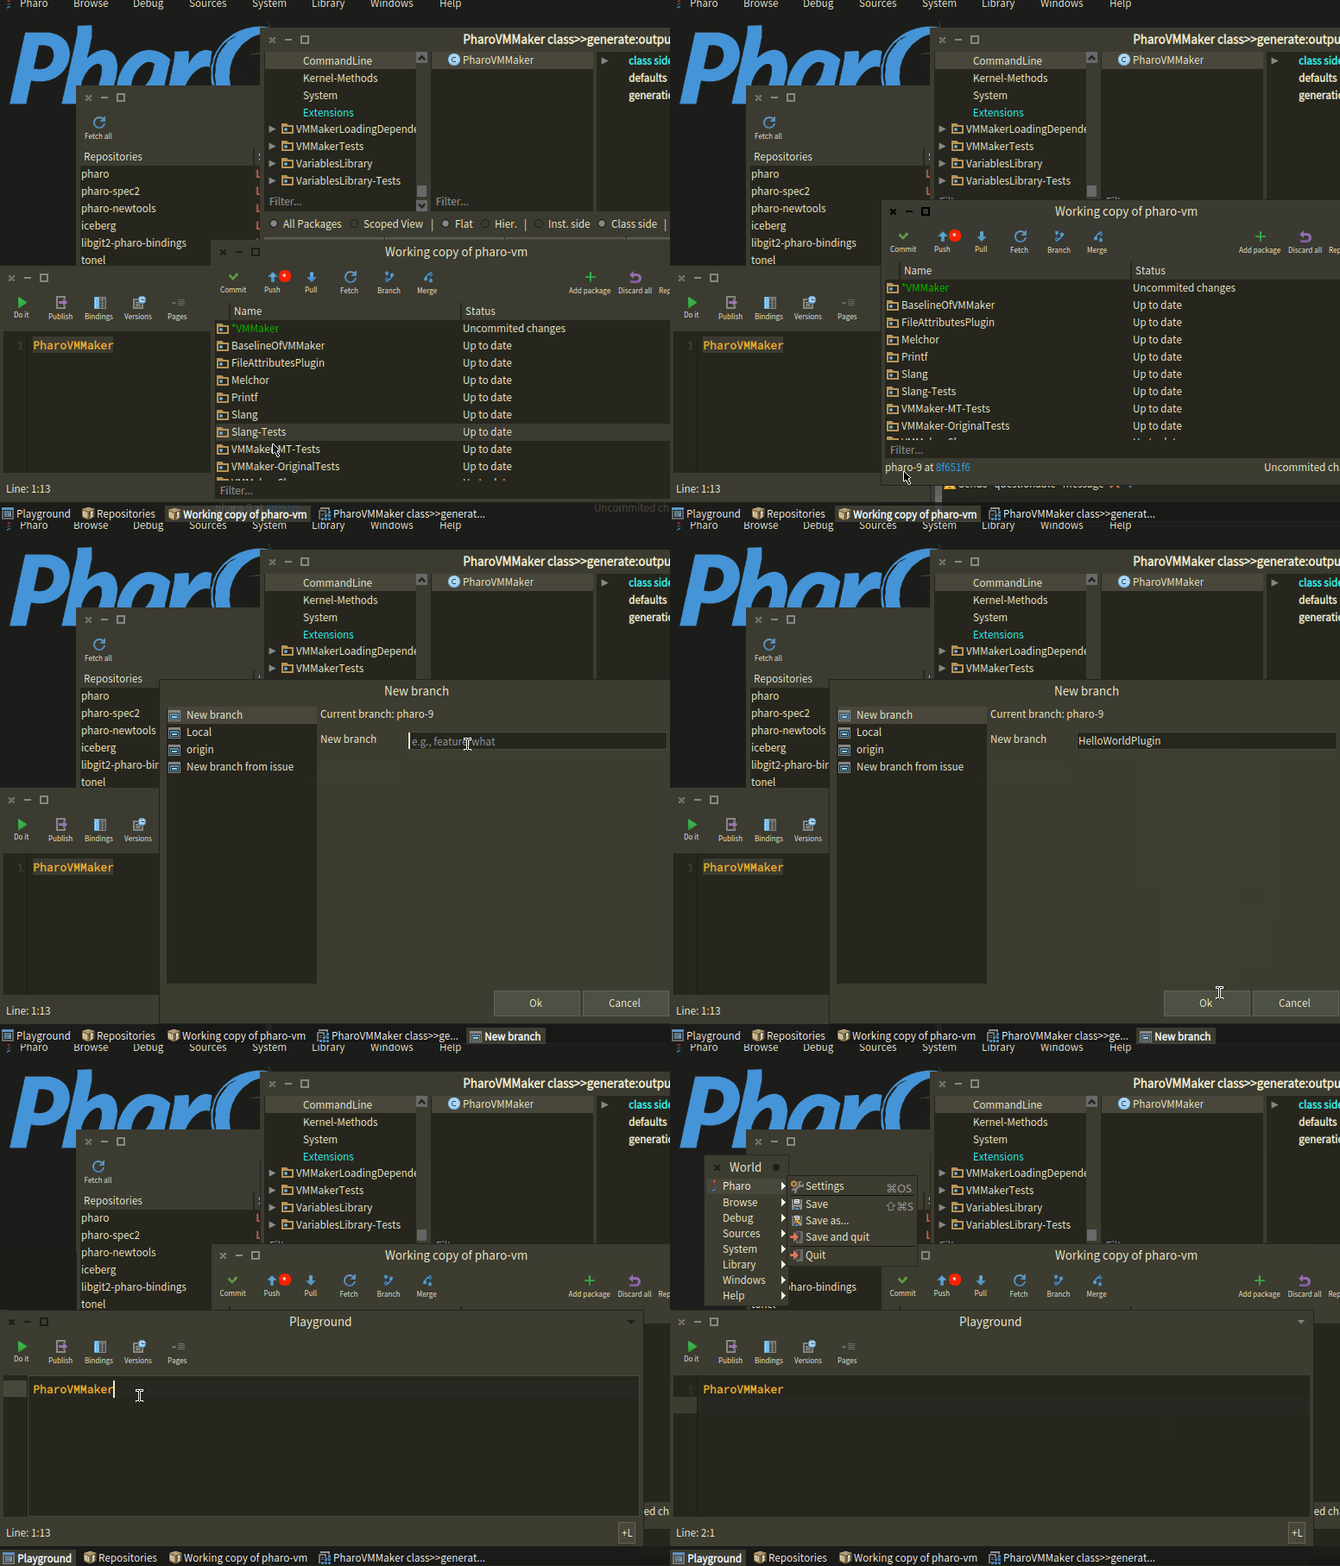
And now we can finally add your plugin code.
Go to SmartSyntaxInterpreterPlugin class. This one will be the superclass of your plugin.
Important: maintain HelloWorldPlugin in the VMMaker-Plugins package as required for automated code generation.
SmartSyntaxInterpreterPlugin subclass: #HelloWorldPlugin
    instanceVariableNames: ''
    classVariableNames: ''
    package: 'VMMaker-Plugins'
In the class side of HelloWorldPlugin add the moduleNameAndVersion method:
moduleNameAndVersion

    ^ self moduleName ,Character space asString , Date today asString
In the instance side of HelloWorldPlugin add the primitiveGetHelloString and stringFromCString: methods:
primitiveGetHelloString

    <export: true>
    interpreterProxy
        pop: 1
        thenPush: (interpreterProxy stringFromCString:
             'Hello from your HelloWorldPlugin.')
stringFromCString: aCString
"Answer a new String copied from a null-terminated C string.
Caution: This may invoke the garbage collector."
<var: 'aCString' type: #'const char *'>
| len newString |
len := self strlen: aCString.
newString := interpreterProxy
instantiateClass: interpreterProxy classString
indexableSize: len.
newString ifNil: [
^ interpreterProxy primitiveFailFor: PrimErrNoMemory ].
self
strncpy: (interpreterProxy arrayValueOf: newString)
_: aCString
_: len. "(char *)strncpy()"
^ newStringIf you're wondering about that unusual looking code, that's Slang, I'm not going to cover that here but is suffice for now to know that it's a code generation tool originally used in Squeak and now used to produce the Cog virtual machine used in Pharo. Slang converts Smalltalk code into C source code, which is then compiled to produce a virtual machine or, as you'll soon see, your HelloWorldPlugin. Slang basically helps to simplify the process of extending the Smalltalk virtual machine by providing an interface for generating multiplatform C code directly from Smalltalk code. This makes Smalltalk more maintainable and portable.
Done and said that, you're almost ready to commit. The only missing piece of development is to tell VMMaker to use your class to create an external plugin.
Browse the PharoVMMaker>>generate:memoryManager: method and add the name HelloWorldPlugin to the array of external plugins.
The full method should be:
generate: interpreterClass memoryManager: memoryManager

    | platformDirectory |
    Author useAuthor: 'vmMaker' during: [
        VMMakerConfiguration initializeForPharo.
        (interpreterClass bindingOf: #COGMTVM) value: false.
        platformDirectory := self platformDirectoryFor: memoryManager.
        [
        (VMMaker
             makerFor: interpreterClass
             and: StackToRegisterMappingCogit
             with: {
                     #COGMTVM.
                     false.
                     #ObjectMemory.
                     memoryManager name.
                     #MULTIPLEBYTECODESETS.
                     true.
                     #bytecodeTableInitializer.
                     #initializeBytecodeTableForSqueakV3PlusClosuresSistaV1Hybrid }
             to: platformDirectory
             platformDir: platformDirectory
             including: #(  )
             configuration: VMMakerConfiguration)
            stopOnErrors: stopOnErrors;
            internal: #(  )
            external:
                #( FilePlugin SurfacePlugin FloatArrayPlugin HelloWorldPlugin );
            generateInterpreterFile;
            generateCogitFiles;
            generateExternalPlugins ] valueSupplyingAnswer: true ]
Now you can commit your changes completing the development procedure and ready to move on to the building procedure.
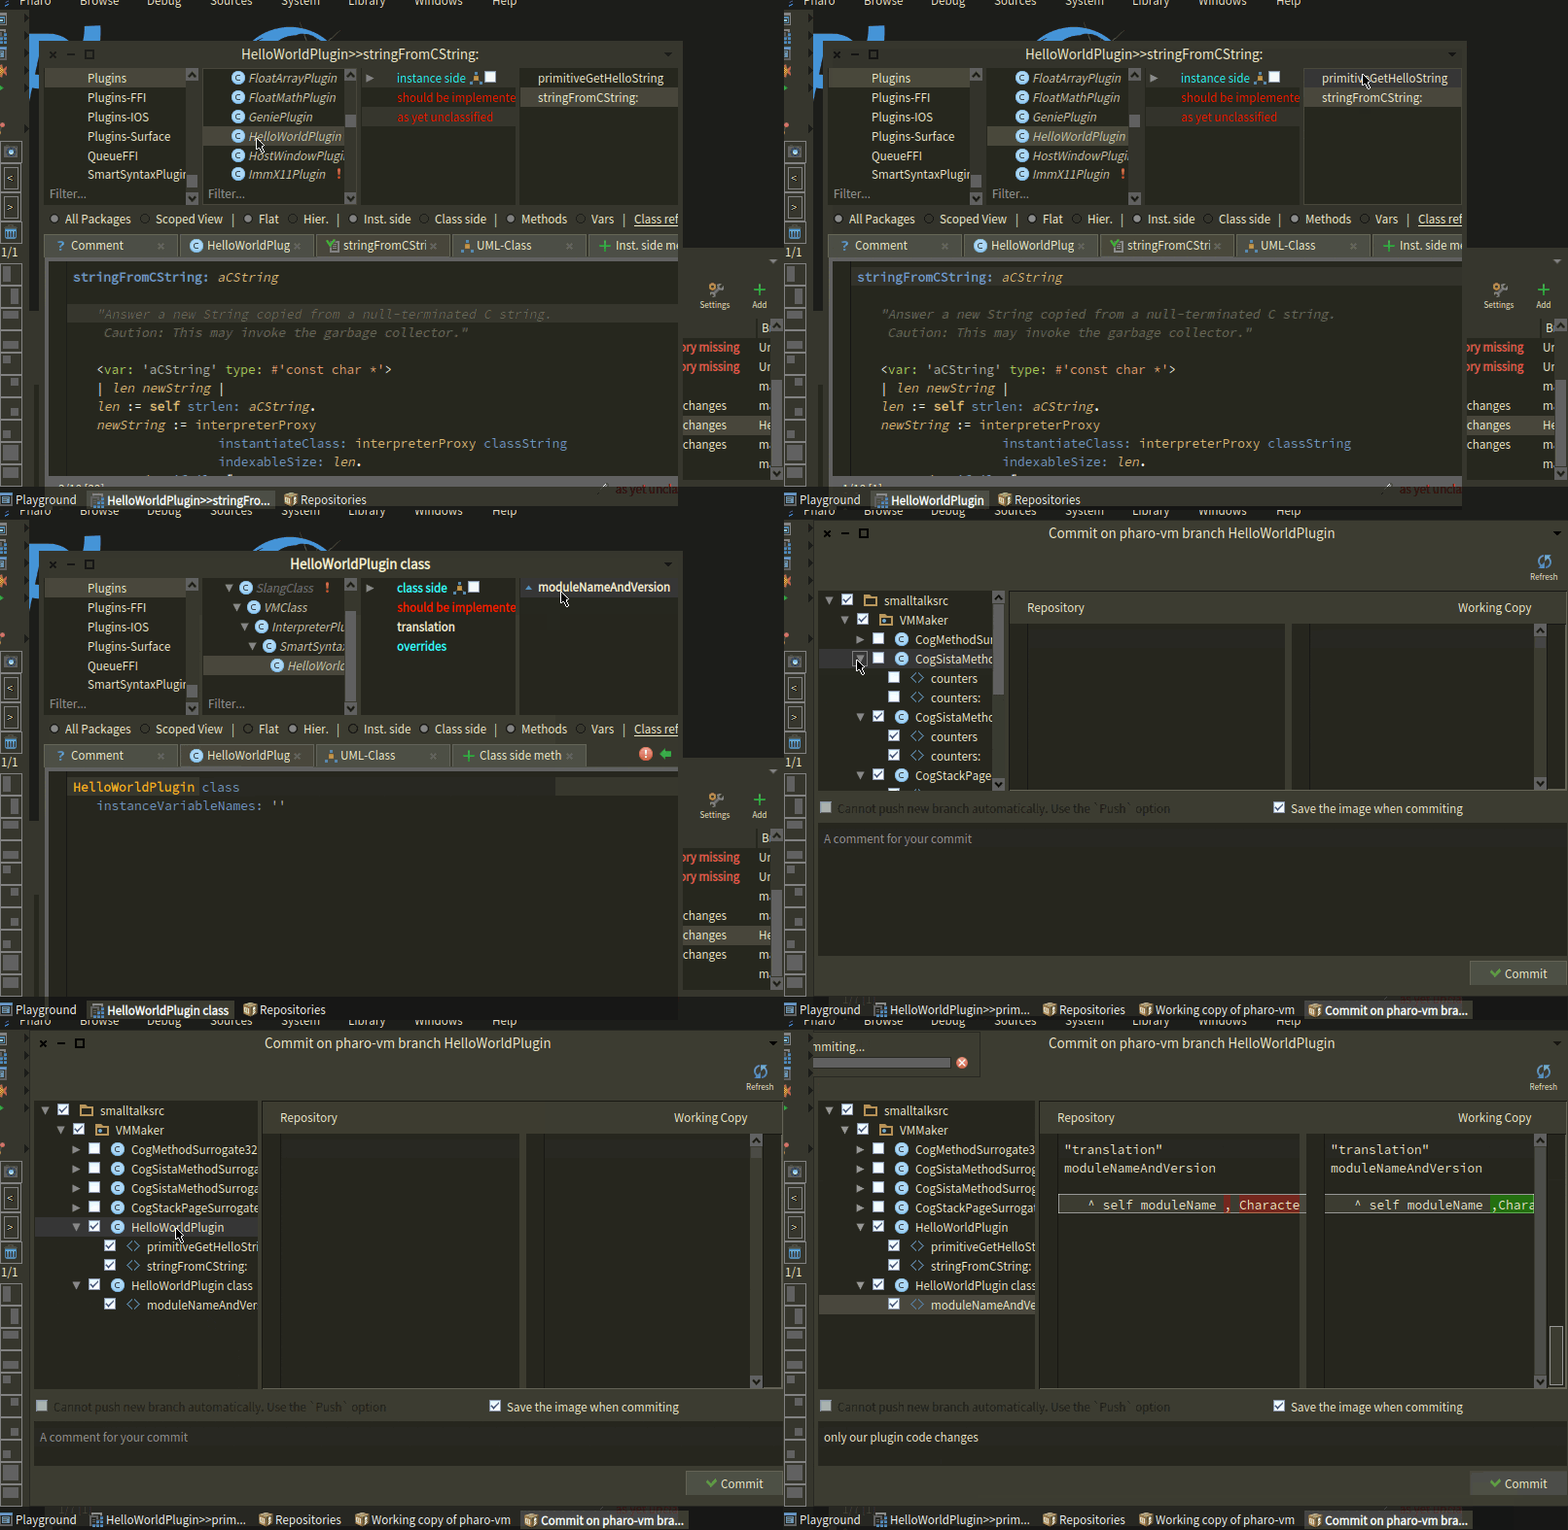
For the building procedure and to evade a chicken-egg kind of problem, we're going to do a first round of running cmake and make commands that will autogenerate the C source code based on your methods written in slang and leave these source files ready to use at build/generated/64/plugins/src/HelloWorldPlugin (and likely also build/generated/32/...).
Go to your MyPlugins/ directory and run:
$ cmake -S pharo-vm -B buildAfter this run, you should see a list of plugins without HelloWorldPlugin, this is expected at this time. Also expected, is that you will not have yet the build/generated/ directory. We are going to produce it in the next command.
From MyPlugins/build run the make command to generate and compile everything for the first time:
$ make installAt the end of this process, you should see that build/generated/64/plugins/src/HelloWorldPlugin does exists now.
Time to tell cmake that it can configure a build including your generated sources. With your favorite editor open for editing the MyPlugins/pharo-vm/plugins.cmake file and add this above or below the configuration for Surface Plugin. We're basically going to tell cmake that it should do with HelloWorldPlugin the same as with SurfacePlugin, build it from the sources as an external plugin.
Your edited plugins.cmake now should look like:
...
#
# HelloWorld Plugin
#

add_vm_plugin(HelloWorldPlugin
    ${PHARO_CURRENT_GENERATED}/plugins/src/HelloWorldPlugin/HelloWorldPlugin.c)

#
# Surface Plugin
#

add_vm_plugin(SurfacePlugin
    ${PHARO_CURRENT_GENERATED}/plugins/src/SurfacePlugin/SurfacePlugin.c)

#
# FloatArray Plugin
#

add_vm_plugin(FloatArrayPlugin
    ${PHARO_CURRENT_GENERATED}/plugins/src/FloatArrayPlugin/FloatArrayPlugin.c)
...
Next, from MyPlugins directory, run cmake again:
$ cmake -S pharo-vm -B buildAnd at the end, you should find it lists your plugin:
...
   B2DPlugin
   BitBltPlugin
   DSAPrims
   FileAttributesPlugin
   FilePlugin
   FloatArrayPlugin
   HelloWorldPlugin
   JPEGReadWriter2Plugin
    ...
And finally, to build your plugin, from MyPlugins/build run:
$ make installOnce the compilation finishes, we can check the results.
As I'm doing this on macOS the resulting directory for the binaries is build/vm/Debug/Pharo.app/Contents/MacOS/Plugins .
And there it is:
$ ls -la build/vm/Debug/Pharo.app/Contents/MacOS/Plugins
$ build ls -la build/vm/Debug/Pharo.app/Contents/MacOS/Plugins
total 83232
drwxr-xr-x  54 seb  staff     1728 Feb 10 19:01 .
drwxr-xr-x   4 seb  staff      128 Feb 10 19:01 ..
-rwxr-xr-x   1 seb  staff   135352 Feb 10 19:01 libB2DPlugin.dylib
-rwxr-xr-x   1 seb  staff    97864 Feb 10 19:01 libBitBltPlugin.dylib
-rwxr-xr-x   1 seb  staff    35952 Feb 10 19:01 libDSAPrims.dylib
-rwxr-xr-x   1 seb  staff    77256 Feb 10 19:01 libFileAttributesPlugin.dylib
-rwxr-xr-x   1 seb  staff    88800 Feb 10 19:01 libFilePlugin.dylib
-rwxr-xr-x   1 seb  staff    22352 Feb 10 19:01 libFloatArrayPlugin.dylib
-rwxr-xr-x   1 seb  staff    17624 Feb 10 19:01 libHelloWorldPlugin.dylib
Let's see it in action:
$ build/vm/Debug/Pharo.app/Contents/MacOS/Pharo build/vmmaker/image/Pharo10.0.1-0-64bit-0542643.image --interactiveCreate an Object subclass: HelloWorld class and add this instance method:
getHelloString

    <primitive: 'primitiveGetHelloString' module: 'HelloWorldPlugin'>
    self primitiveFailed
And test it from this snippet:
Smalltalk vm listLoadedModules.
Smalltalk vm listBuiltinModules.

hello := HelloWorld new.

hello getHelloString. 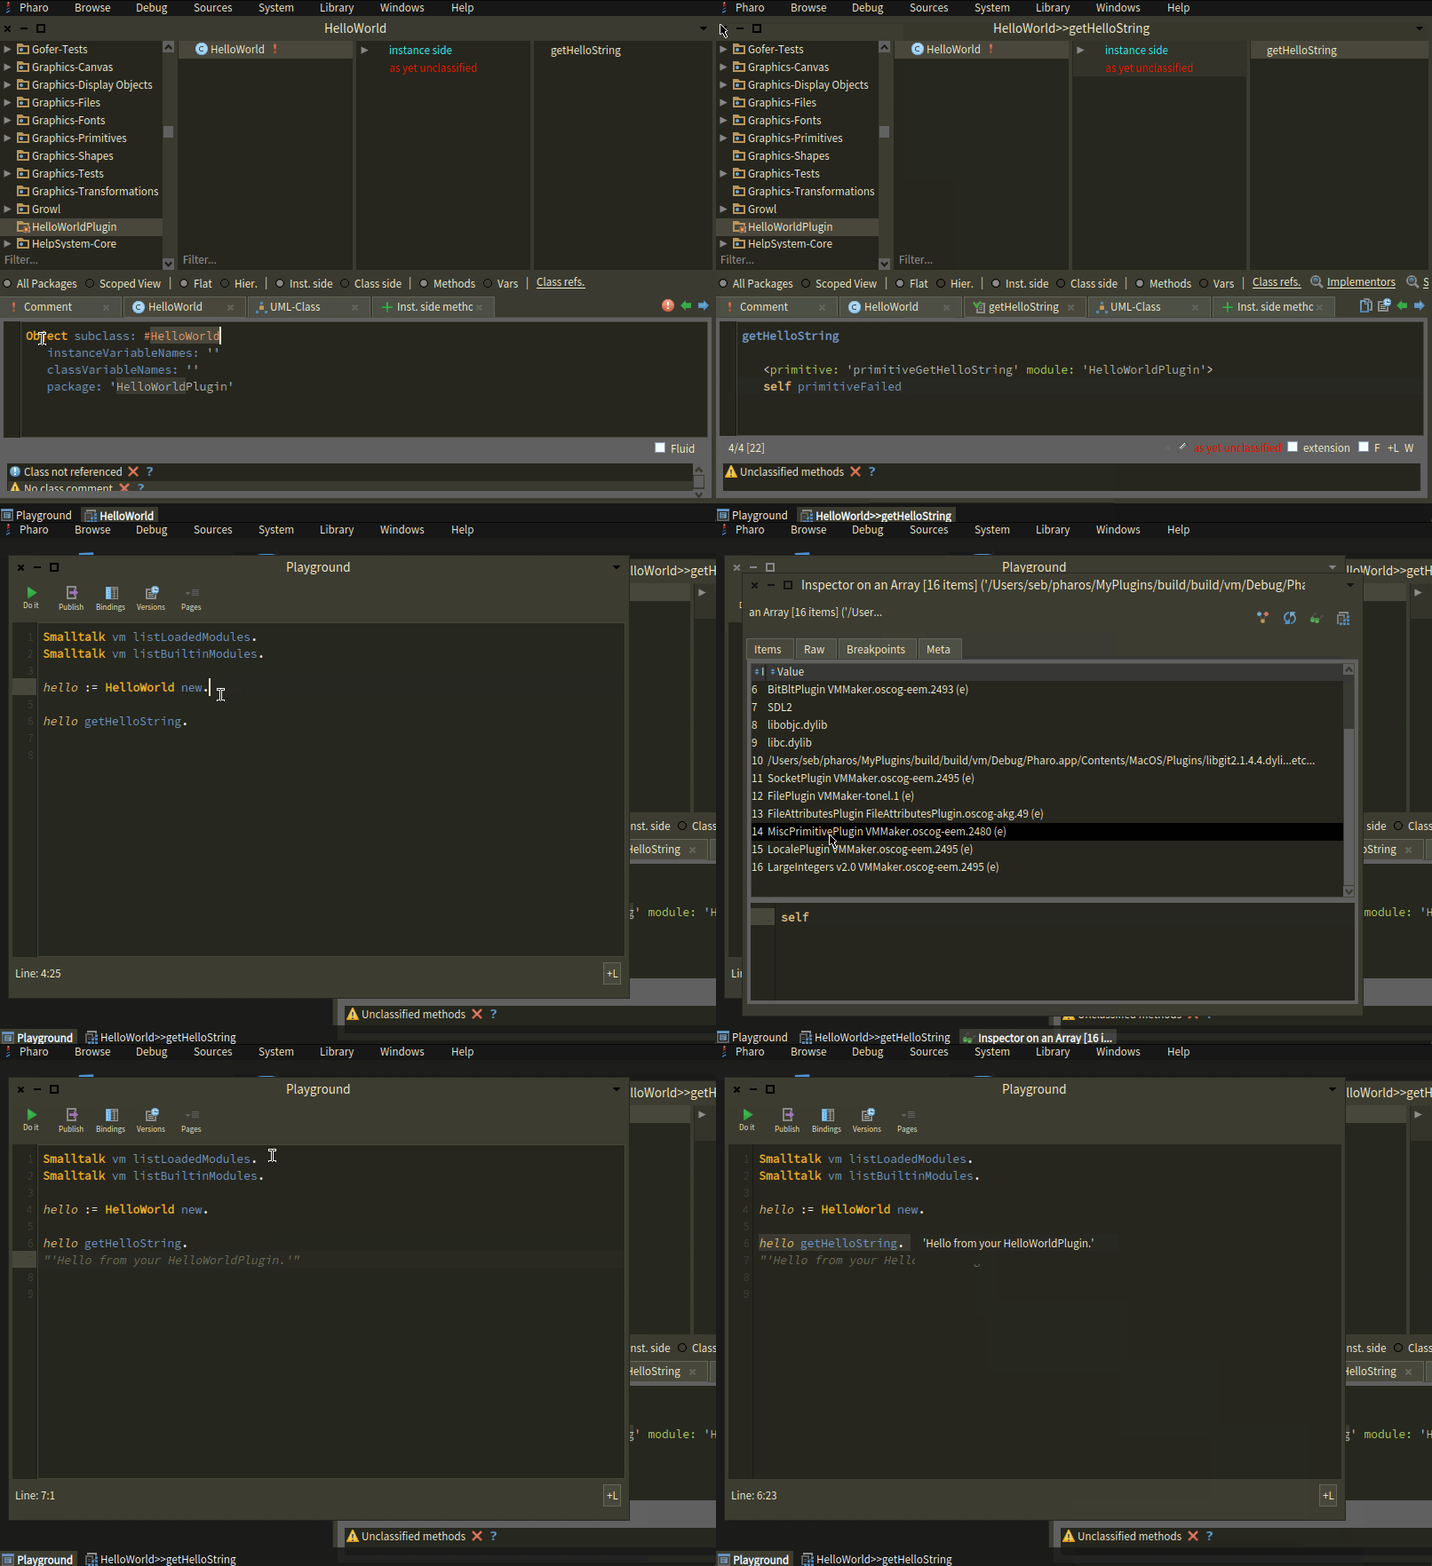
With all going well, in your workspace you'll be getting the string produced by your new primitive.
Notice that is you check listLoadedModules before using getHelloString your plugin is not going to be loaded but if you check after using it for the first time, you'll find it there showing that Pharo lazy loads the plugins.
Benchmarking
As it gets revealed by now, creating a Pharo Smalltalk plugin requires significant effort, so to get a sense of proportions of what you get for it, lets compare how your plugin performs against a C shared library.
Rust is known to have a general computing performance almost at par with C so I've built this simple hello world lib here that can be used to measure this. The README.md file has instructions to build the library.
Go ahead in and build it for release.
$ git clone [email protected]:sebastianconcept/librusthelloworld.git
$ cargo build --release
You will find the built library in:
$ target/release/librusthelloworld.dylibCreate a symlink in the image dir so it can find target/release/librusthelloworld.dylib.
Create RustHelloWorldLibrary as subclass of FFILibrary and add this method in the instance side:
macModuleName
    ^ 'librusthelloworld.dylib'
Create HelloWorld as subclass of Object and on the class side add these three methods:
ffiLibrary

    ^ RustHelloWorldLibrary
getFFIRustHelloString
^ self ffiCall: #( char * get_hello_world #( ) )getHelloString
<primitive: 'primitiveGetHelloString' module: 'HelloWorldPlugin'>
self primitiveFailedWith that, you'll have accessors to the strings that come from the lib in the FFI case and from the primitive of your plugin in the other case:
HelloWorld getFFIRustHelloString.
HelloWorld getHelloString.
Install ABBench for easy comparing bechmarks:
Metacello new
  githubUser: 'emdonahue' project: 'ABBench' commitish: 'master' path: '';
  baseline: 'ABBench';
  load.
And run some on these two methods.
Here are the results is showing in a 2.5GHz Intel Quad-core i7 on macOS:
[ HelloWorld getFFIRustHelloString ] bench.
"'402334.199 per second'"
[ HelloWorld getHelloString ] bench.
"'22058210.074 per second'"

ABBench bench:[ ABBench
    a: [HelloWorld getFFIRustHelloString]
    b: [HelloWorld getHelloString ] ].
"B is 3087.45% FASTER than A"
Conclusion
Extending the Pharo Virtual Machine with a plugin is a less-traveled road, but one that offers a lot of potential. Whether you are looking to increase performance or simplify the process of accessing specific functionality, plugins can offer a way to extend Smalltalk in a way that keeps your technology stack simple, elegant and powerful.
The steps involved in producing a plugin are not as straightforward as with FFI, but with a little time and effort, you can create very powerful plugins that add new functionality to your Pharo applications. We hope that by working through the development cycle of a HelloWorldPlugin as described in this article, you can get a sense of the process involved and gain a deeper understanding of the Pharo Virtual Machine.
Overall, extending the Pharo Virtual Machine with a plugin is an excellent way to maximize the potential of Smalltalk, and we hope this article has inspired you to take the next step in your Smalltalk development journey and unlocking potential.
Acknowledgements
A thank you note to the maintainers of the paro-project/pharo-vm, and Guille Polito in particular, which were kind enough to review and merge this modest PR which allows to quickly test that PharoVMMaker is able to generate the source code for the list of plugins that you define.
And a very special mention to Pierre Misse-Chanabier which whom I had many conversations in june 2022 discovering how to get this done. Thanks a lot! None of this work would have been possible without your kind attention and explanations Pierre!

